


Dear Jane... or Dear God, am I crazy?!
I am so beyond giddy - I finally decided to reach for one of my HUGE bucket list items! The sad thing about working so hard to build a viable business and serve a community that I adore is that I really don't have time for anything else. Literally. We work all day, usually into the evening or night, eat dinner, collapse and chat for a few minutes, then crash. For now, that's every single day. I've tried really, really hard to fit some mindless tv (usually movies I've seen a million times) into my before-bedtime routine, but being idle for 30 minutes is still hard for me. And same for during the day, I really should be taking time to sit down every few hours and chill, but I don't because I hate being idle. That's where EPP (English Paper Piecing) comes in. 10 years ago today I made my first hexie pieces, and that became my first love in quilting. It occurred to me that if I had an incentive to sit down, then maybe I would? So I pulled out the last of my Lucy Boston blocks and sure enough, I find 5 or 10 minutes throughout the day to sit for a minute and get off my feet. Furthermore, I meditate in the mornings and this would be a great meditation exercise. The number one reason EPP works for me is that it's portable, and I can spend 5 minutes on it and actually make serious progress. Doctor's office, car rides, guild meetings, coffee with friends, holidays with family... that's how I quilt. So anyway, back to the crazy Dear Jane. I'm not going to give the history of Dear Jane, Google it if you're curious. Very interesting stuff there. It's been around forever and many have made the quilt, usually traditionally pieced or foundation pieced. I flirted with the idea of foundation piecing, but the pieces are just small enough to frustrate me, which is odd. I was poking around on PaperPieces.com to see if I could find a satisfying EPP project when I noticed that there is a full set of EPP papers for Dear Jane (it's huge and NOT cheap). There's also a set of acrylic templates for the most common pieces. I thought about it and dismissed it several times until I was meditating last week and my soul said YES to making it. My papers, templates and ample supply of Sewline glue refills arrived today (squeee!), see below. In the meantime, I set about deciding on how to approach my Dear Jane and planning the fabric.
First, and almost obviously, I decided on bright, modern-leaning fabrics for my focus prints, and mostly black/white/gray text prints for my background fabric. The plus side is that it's the perfect quilt for scrappy design and small pieces. The finished size of each block is 4.5", so that tells you how small some of the pieces are. That means solids, reads-like-solids, and mostly small-scale prints.
Not wanting to spend a lot of time hunting down fabric, I wanted a large bundle of color fabric to pull from, so I found this amazing fat quarter bundle at The Cotton Farm in Roswell (the PERFECT place for modern fabrics and great finds!).

These won't be the only fabrics I use, I also have several scraps and pieces to blend in as well. But this is a great base to have handy.
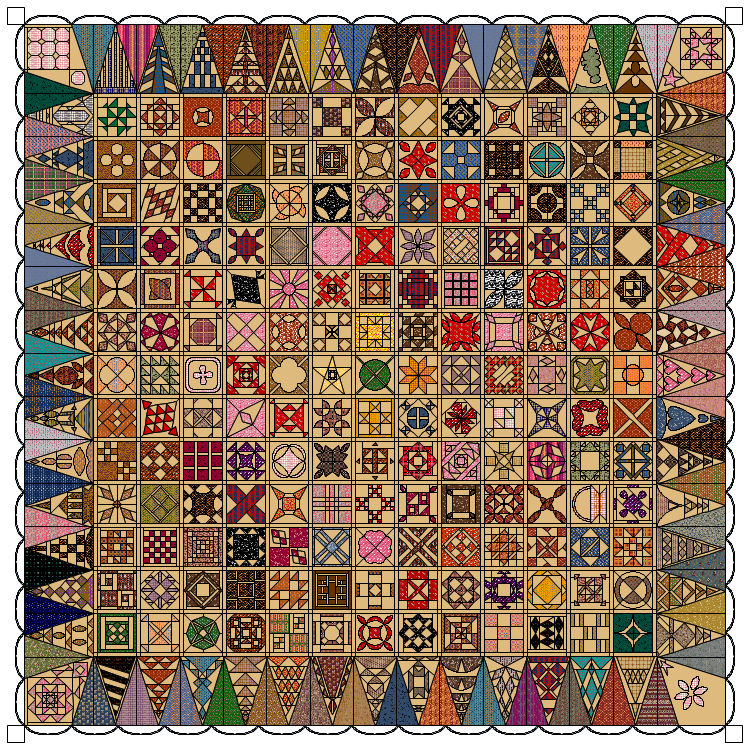
I wanted a little bit of order, so I opened EQ7 and made a 13 x 13 block quilt for the center (that's 169 blocks for those counting, and according to the book, 5,602 pieces total). I am doing rainbow-ish colors, so this is the base of my quilt. Each block is made of one focal fabric and one background fabric, so the colors here represent the focal fabric of each block. Nothing hard and fast, just a plan to keep it cohesive.

If you don't have EQ7, it's easy to find printable graph paper online to print out and color in with pencils or crayons. Also, you should Google "Dear Jane Quilt" and sit back and look in awe at the variations of Dear Jane. It's pretty incredible.
I have no particular goal other than to make more time for me, even if just a few minutes here and there, to enjoy this journey. I'm not aiming for a block a day, a week, a month... just whatever comes will come. Here's the pack of papers that arrived today. It's... there are no words. It's kind of overwhelming - and call me crazy, but this excites me so much! I love the challenge and perfecting my skill! I like that it isn't just easy-peasy.

God Bless Brenda Papadakis for making this possible! I saw a blog where one lady cut out one block's worth of papers herself and that looked insane. Inside this bag the bags for each row, which includes instructions and notes for that row with any modifications and all the papers for the row.

When you open each of those bags, this is what you get:

And to give you an idea of the amount and size of the foundation papers, here are all the pieces ONLY for the first 6 blocks:

I'm not really sure that picture does it any justice, honestly.
I also ordered the template kit, which are 9 of the most common pieces used in the quilt.

To give you a sneak peek and a preview of how this is going to work, I managed to get one block prepped and ready to sew today. If I had to guess, I'd say most block will take an average of an hour, which includes picking the fabric, marking and cutting the fabric, pulling out the proper pieces, and glue basting the pieces. That's just a guess, though, maybe not as long once I get rolling. Here's my first block, which is block A4. I started with that one because my Dear Jane book hasn't arrived yet, but this block layout is in the instruction book because of a minor modification.

I'll post another picture once it's actually sewn together and becomes a block.
I definitely prefer to glue my pieces rather than thread baste. In fact, I can't even wrap my head around how some of these pieces could be thread basted. So I have 20 Sewline glue refills ready to go!

I've been experimenting with thread for a long time, and up until recently, Aurifil #50 was my go-to. It's the least linty of the 100% cotton family, but honestly, I had a lot of thread breaks with it because it's delicate. I don't like poly or silk - I really, really wanted to love Wonderfil's Invisifil line because it's semi-translucent, durable, and seemingly perfect for EPP. Remember you can't just use a thick, sturdy thread because you want to minimize the visibility of your stitches and remove as much bulk from your seams as possible. But the poly threads are too slippery and I didn't feel like they locked very well. So back to cotton. Then David at Vector Quilts & Sewing Center got in a new line from RNK called Quilter's Select. It's a poly core with a cotton wrap on it, so it's like the best of both worlds. The poly core really gives it the strength to hold up to my tugging on it through layers of fabric, and the cotton wrap on it helps the stitches to lock. I get way less knotting because it's a low-lint thread, and it's a #60 so it's super fine to hide my stitches. I have been using off white even on dark fabrics and with my stitch technique, you almost can't see my stitches at all!

As for needles, I am a diehard Tulip fan. I almost always use a Tulip needle for hand sewing - they are a bit luxurious and even the packaging is sexy.

Needles are definitely a personal preference, so it may take some time for you to find what works. My best advice, though, is to NOT skimp on needles. Don't go for something cheap. I am the last person to think or suggest that expensive is always better, because that's rarely the case. But in terms of needles, cheap needles mean burrs, defects, and most importantly, hand fatigue. Tulip needles are polished so well that they glide right through the fabric and my hands don't cramp up or get tired. I personally prefer the #10 Milliners needle, which I also use for hand binding.
One other tip I'll share - comfort. The hardest aspect for me to figure out is how to keep my fingers from getting sore and blistering where the needle rubs constantly. I CANNOT use a thimble. I just can't. I've tried every thimble on the market, and it just takes the fun out of it for me. The best thing I've ever found are the little leather dots. They have adhesive on the back and they are padded, so they work perfectly. But they are not cheap, and I use a ton of them. For a long time, they were all all over our house. I think there's still one on our butcher block in the kitchen. In order to stretch their use, I bought those circle bandaids (not always easy to find, by the way), and would put those on over the leather to use them longer. But that's just not practical, as I would spend my 5-10 minute break getting it situated. Anyway, found a tip on a Dear Jane EPP YouTube video that is my new go-to. Athletic tape! I never even thought about this in my 10 years of hand sewing! It's cheap, easy to find, durable, and it sticks to the skin for long periods. Cut off small pieces and put them on your fingers where you need it. It's perfect!
As I go along, I'm happy to share more of my journey, share tips, and answer questions if anyone is interested in this or any aspect of EPP. I do want to do a post about stitch techniques. I've found that the way you stitch is a careful balance between hiding your stitches and actually enjoying the process. That deserves a whole blog post.
Paul, the amazing man that he is, is making me a bag to keep this in to keep it portable. He's using a new Sew Sweetness pattern to make a "toolbox" type bag - tons of pockets and perfect for projects! Fabric I chose is mostly Tula Pink, of course. As soon as he's finished, I'll post pics and give details. You're going to want this bag! More than one person has contacted me with a potential interest in joining me on this journey, anyone else want to quilt along with me?